Your pain, in fact, is all in your head.

We talk a lot at Spinal (con)Fusion about different painful conditions of the spine and their treatments. It occurred to me, though, that I haven’t spent much time talking about pain specifically. How is it perceived? Why does the brain perceive it in such a way? How can these perceptions be altered or attenuated? It turns out that the answers to these questions lie deep within that which makes us human: our brain. It turns out that your pain is all in your head.

Pain is modulated by several different regions in your brain. How do we know this? In the past, we’d have to rely on animal models in which scientists would injure part of the animal’s brain and then study the effects of that injury. Over the past decade or so, however, we now have a non-invasive way to study the function of the brain: functional MRI or fMRI. This is a unique form of MRI imaging that looks at differences in blood flow in certain brain regions when a patient performs a task or is in a specific physiologic state. Over the past 10 years in particular, fMRI (and large AI-driven databases of established fMRI data) has unlocked a new world of understanding about the regions of the central nervous system that process acute and chronic pain. What have we learned?

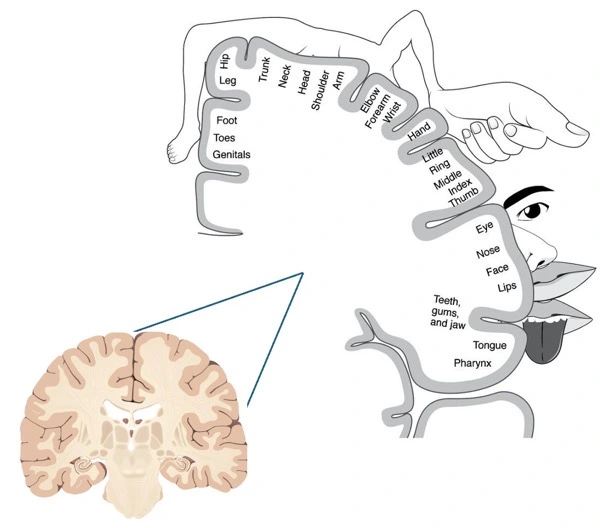
When you, say, touch a hot stove, the painful stimulus is transmitted from special sensors in your fingertips via unmyelinated (uninsulated) C-type nerve fibers (I only mention this specifically because this type of fiber is well preserved over hundreds of millions of years of evolution because even the most basic primitive creature had to be able to perceive pain from the periphery and avoid it.) The pain signal then enters the gray matter of the spinal cord, crosses over to the other side of the spinal cord and ascends via the spinothalamic tracts to the brain (hence, if you touch a hot stove with your left hand you’re perceiving it in your right brain.) It takes about 100 milliseconds for this signal to travel from your hand to the brain. The thalamus is the first stop within the brain for information on painful stimuli transmitted from the periphery. These signals are analyzed within the thalamus and then transmitted to the primary sensory cortex at the surface of the brain (this part of the brain is somatotopically organized meaning that each part of the body is represented in different zones of the sensory cortex, see figure 1.) The primary sensory cortex (along with the posterior insular cortex) are then able to analyze the nature and intensity of the painful stimulus–basically, these regions collect and analyze the basic facts about the pain, the “what, where and how bad” of the pain.

Pain regions in brain.

Figure 1: the sensory homonculus demonstrating the somatotopic organization of the primary sensory cortex.  Source, in part: Baweja, 2020.

Ok, so back to the hot stove. Of course, you know that the stove is very hot, and you know which appendage on which side of your body is in contact with the stove (e.g. “OUCH!! My left hand is burning!”) This is all the work of the spinothalamic tract, the thalamus and lastly the primary sensory cortex. From there it gets much more complicated. From the sensory cortex a number of projections extend out to other brain regions which analyze the pain on a much deeper level (see figure 2.) First, there are projections to the secondary sensory cortex and anterior insular cortex that allow to the brain to assign a degree of context and unpleasantness to the stimulus (e.g. “OUCH! My left hand is burning and it’s awful and it could be because I wasn’t paying attention to where my left hand was when I was scrolling on my phone with my right hand!”). Next (and these projections out of the primary sensory cortex are all happening concurrently), there will be projections to the primary and supplemental motor regions to immediately to move your arm to escape the pain and to plan avoidance strategies to prevent burning yourself again (e.g. “OUCH! My left hand is burning! I’m gonna pull my left hand back RIGHT NOW, oh and next time I’ll put my left hand in my pocket when I’m scrolling on my phone with my right hand.”) There will also be projections to prefrontal cortical regions such as the anterior cingulate cortex and dorsolateral cortex which are involved in higher cognitive processing about the pain (e.g. “OUCH! My left hand is burning…and MAN…that hurts! But it this pain really a threat to me? Maybe it’s not really harming me, and I shouldn’t freak out?”). There are also direct projections from the thalamus to the rostral dorsal anterior cingulate cortex (rdACC) and anterior insular cortex that modulate that extent of emotion and suffering attributed to the painful stimulus (e.g. “OUCH! My left hand is burning and I this is really hard on me…I’m really suffering here and don’t know if I could ever endure something like this again.”) Lastly, there are projections to the amygdala and hippocampus regions that also somewhat modulate fear and emotional responses to the pain but also the imprinting of memories about the pain and its context (e.g. “OUCH! My left hand is burning! This has been a scary experience. I’m going to remember this and probably will never go near a stove again.”) Some researchers have boiled down these pathways into a lateral system which process the details of the painful stimulus (i.e. the “painfulness” component), and a medial system which processes the cognitive and emotional responses to the painful stimulus (i.e. the suffering component, De Ridder et al 2021). Importantly, in addition to these ascending pathways, there is a set of descending pathways that can suppress the pain information coming into the brain. These pathways allow you to identify and adapt to sources of pain so that they don’t become too disruptive. These descending pathways are especially influenced by the context under which the pain was experienced; for example, these pathways become more active when pain is perceived as pleasurable as in the burn of an intense workout (see figure 3.) These three groups of pathways, all confirmed by large fMRI studies, are kept in a finely tuned homeostasis via connections that run through the thalamus.

Pain regions in brain.

Figure 2: Brain regions for perception of pain. 

This all may seem excessively complicated but put simply, there is a so-called “neuro-matrix” of different regions the brain that regulate many different aspects of one’s perception of pain. While these connections are similar between all people, some of the connections may be more impactful than others from one person to the next. For example, an elite ultra-marathoner who has learned not only to manage pain but perhaps even to embrace it is going to have much different wiring of these pathways than, say, a couch potato to whom the thought of running to even the mailbox elicits pain and anxiety. Of course, there are likely genetic differences between people that can predispose them to these differences in their pain pathways. Generally speaking, however, it’s helpful to think that at least early on in life these pathways are similar between people but then are remodeled over a person’s life based on their life context and experiences with pain (more below.) These pathways can change, because just like about all the other wiring in the brain, the neuronal pathways of pain have a high degree of plasticity. In other words, they can change, for better or worse.

Figure 3: This guy’s descending (inhibitory) pain pathways are on overdrive!  Source: https://www.nytimes.com/2011/05/03/science/03firewalker.html

The normal anatomical “wiring” of pain perception that we’ve discussed up until this point can generally be thought of as relating to the perception of an acute, short-lived process like a painful radiculopathy or the mechanical back pain of a mobile spondylolisthesis. But what happens in chronic pain (a.k.a. pain that persists 3-6 months after a radiculopathy/episode of back pain should have healed)? Here, the pain truly is in the brain.

Many factors can lead to a patient transitioning from acute to chronic pain. It’s generally thought that repetitive pain leads to a localized increase in neuro-inflammatory markers which then leads to peripheral and the central sensitization. Basically, the brain gets used to the pain and begins to expect it and even perceive it in the absence of a painful stimulus. The patient develops a hypersensitivity to even the slightest of pain and thus begins to chronically perceive pain. This transition doesn’t happen in everyone though; certain people are more susceptible to the development of chronic pain than others. First, as we mentioned, genetic variations in the expression of certain inflammatory markers or neurotransmitters can make someone more likely to develop chronic pain. Second, epigenetic factors may also come into play (i.e. how your environment alters the expression of your genes): traumatic/stressful events in childhood, low socio-economic status, environmental toxins and poor diet have all been linked to this transition. Lastly, recent research suggests that even the gut microbiome may play a significant role in predisposing patients to the transition from acute to chronic pain. There essentially is a direct connection between the gut and the central nervous system that modulates one’s inflammatory response and thus can then affect peripheral and central sensitization to pain. Finally, when central sensitization occurs in the setting of preexisting psychological disorders such as depression and anxiety the conditions are ripe for the development of the chronic pain. Now, the medial pathways that encode the suffering response to pain become overly active and the inhibitory pathways become attenuated or even completely absent. Fear, anger and anxiety take over. With time, measurable structural alterations occur in the brains of patients with chronic pain. Patients with chronic pain get loss of neurons in regions of the brain that help modulate and critically assess pain, making them less resilient when dealing with pain in the future. So, patients with chronic pain aren’t crazy or weak in the face of pain; no, their brains physically change in the setting of chronic pain.

In closing, fMRI studies have clearly shown that patients with chronic pain have definitive structural changes to their central nervous system. These changes cause the “suffering” component of the pain, the fear and anxiety of the pain, to be amplified and can cause the patient to experience severe pain, even in the absence of ongoing painful stimulus. In short…patients become wired for chronic pain. Here’s the good news though: plasticity goes both ways. The rewiring and structural changes seen in the brains of patients with chronic pain can be modulated and even reversed. In our next post we’ll talk about various therapies that reverse these structural changes to treat chronic pain.

Thanks for reading!

J. Alex Thomas, M.D.

References:

Baweja, Akshay. (2020). Haptic Glove Display: Enabling Sensory Substitution. International Journal of Scientific & Technology Research. 9. 4759 – 4763. 

De Ridder D, Adhia D, Vanneste S. The anatomy of pain and suffering in the brain and its clinical implications. Neurosci Biobehav Rev. 2021 Nov;130:125-146. 

Medicine in the age of Google reviews

Because I set up our Google advertising and business account several years ago (it’s since been handed over to one of our administrators) I still get notifications when patients leave us a review on Google. A few weeks ago, I received notification of the review below:


You Suck anonymized

What am I supposed to do with “You suck”? Look, we clearly don’t get everything right and patient are rightfully unhappy about it. Sometimes we’re running late (ok, more than sometimes.) Sometimes we miss a referral or don’t return a patient call promptly enough. Those are areas where can improve and fair online criticism can help point us in the right direction on areas in which we need to improve. “You suck” isn’t helpful at all in this regard. If a patient leaves a legitimate criticism online our practice administrator will call them immediately and try to find out what happened so that we can be sure it doesn’t continue happening. “You suck” is not a legitimate criticism and thus doesn’t help us improve.

The bigger issue here is that “You suck” is just unfair and highlights the problem with online reviews in medicine: they give outsized importance to the unhappiest patients. First, patients are more likely to take the time to write a negative review than a positive one. The unhappy patients seem to have all the time to do so. Our happiest patients, the ones that actually have surgery, are back leading active lives and don’t take the time to leave an online review. In fact, we’ve had to take measures to ensure that our happy patients leave reviews to “dilute” the unfair negative ones. In other words, we must play the game. Thankfully we do excellent work so just about all our patients are thrilled with their care and don’t mind saying so online. Still though, the solicitation feels a bit slimy.

In addition to being more likely to write reviews, unhappy patients who write negative reviews do so with much more emotion and conviction. It makes them feel good to get revenge on their uncaring physician for their perceived poor treatment— “You suck” as a doctor! There are many reasons a patient may feel poorly treated. Maybe they’re unhappy to be seeing a PA or NP instead of me (even though the PAs and NPs on my team are better diagnosticians than I am!) Maybe they’ve had a bad surgical outcome elsewhere and are still upset about it. Maybe it’s because we won’t prescribe the opioids they’re looking for. Maybe they’re just pissed off at the world. I don’t know. What I do know, though, is that that none of the negative reviews are from patients who have surgery with us. All we did in the “You suck” case was, compassionately I should say, tell the patient that their problem wasn’t a neurosurgical one.

Inevitably the negative reviews will get more attention than the positive ones do. First, patients tend to put more weight in one negative review than a mountain of positive reviews. In fact, experts suggest that you need 10 positive reviews to cancel out the effects of one negative review. More concerning is that your physician pays more attention to these negative reviews too. Physicians today are expected to provide perfect, compassionate care 100% of the time. Because of this expectation, any positive feedback is often quite muted when the care goes as planned. When the care doesn’t go as planned (or even if the patient just has that perception) the negative feedback can be intense. This problem of asymmetric rewards in medicine haunts us from training through our careers and is one of the main causes of physician burnout in this country.

Thankfully I am confident enough in the care that I provide that at this point in my career I just find humor in reviews like “You suck.” I do think that online reviews can help patients make more informed decisions about their healthcare. Obviously, you should beware if a physician has way more negative reviews than positive ones. Otherwise, try to look past the reviews of a few bad apples and trust the many more positive ones the physician is likely to have.

Thanks for reading.

J. Alex Thomas, M.D.

The faster you get up and moving after your surgery, the better you’ll be.

When a patient undergoes a spinal surgery like a spinal fusion, there are several factors that can affect their odds of having a successful outcome. Sometimes these factors aren’t entirely under our control. If a patient comes in acutely injured from a trauma, for example, they may already have the deck stacked against them. In most instances, though, we can control the factors necessary to maximize the chances of an excellent surgical outcome. These factors are called modifiable factors. Some of these, like choosing the right surgical approach or perhaps the correct type of implants, are determined before surgery. Other factors like avoiding patient repositioning or the use of proper sterile technique occur intraoperatively. In my opinion, the best postoperative modifiable factor to ensure an excellent outcome after surgery is early ambulation.

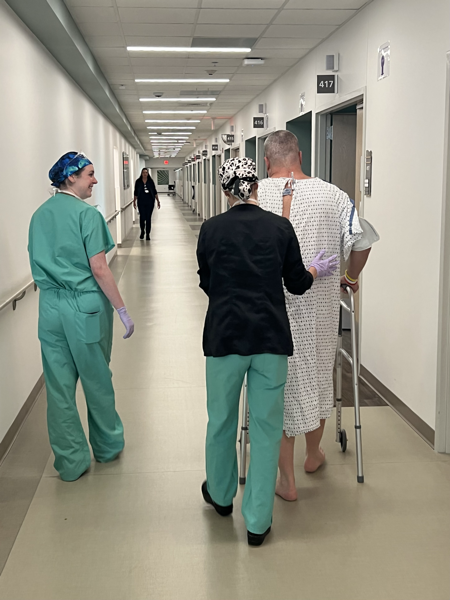
In our practice we have a very particular routine on our surgery days; it’s a routine that I’m especially proud of. When the cases are done (no matter how tired we are) we’ll go up to the patient floor and we’ll force each of the day’s fusion patients to walk with us just hours after their surgery (including multi-level fusions!) Often the patient is doubtful that they’ll be up for the task given their immediate level of discomfort after the procedure (sometimes they look at us like we’re crazy!) Once we get them on their feet, though, and once they stretch out a bit, they notice immediate improvement in their pain level (paradoxically, a standard hospital bed is awful for recovery from spine surgery.) You can see it on their faces. Some patients can just take a few steps, others are ready to race us down the hallway (see figure 1.)  Even the shortest amount of immediate ambulation is paramount, though.

859A23C7 776F 44F5 A4DF 5F3699D21F2F 1 201 a

Figure 1: Our outstanding PAs Catherine Zimel (left) and Karli Smiraglia help a fusion patient get his first few steps in only hours after surgery!

I’ve been doing this immediate post-op walking routine for all fusion patients for years now because I am certain that patients who ambulate earlier have not only better pain control but also less postoperative complications. The patients who walk on the day of surgery just do better. This isn’t just anecdotal; it’s been clearly demonstrated in the literature. In a study published this year out of the Hospital for Special Surgery in New York, Lovecchio et al examined 191 patients who underwent surgery for adult spinal deformity (large surgeries with multiple levels of the spine reconstructed and fused.) When they controlled for all other variables, they found that only delayed ambulation and larger Cobb angle (a more deformed spine) led to higher rates of complications—delayed ambulation led to an over 2X increase in complications! In another analysis of over 23,000 patients in a database of all patients undergoing lumbar spine surgery in Michigan, Zakaria and colleagues found a decreased length-of-stay and decreased risks of readmission, urinary tract infection, urinary retention (inability to urinate) and ileus in patients who ambulated on the day of surgery. The authors also estimated that ambulation on the day of surgery could result in nearly $75,000,000 in annual US healthcare savings just from the prevention of readmissions alone! Lastly, Adogwa and colleagues examined 125 elderly patients who underwent fusion surgery for spinal deformity. They found that the risk of at least one surgical complication was nearly 50% higher in a “late ambulator” group and that delaying ambulation for even 24hrs results in a significant increase in complications. We see this in our own patients too: the difference between a patient who ambulates on the day of surgery versus the patient who does not (because they’re too sedated or because they got to their room too late in the day) is immediately apparent the next morning when we come in for rounds. So, if you’re having a spinal fusion, if you advocate for nothing else for yourself immediately after surgery, make sure you’re getting someone to help you get up and walk (no matter how much it hurts!) Your recovery will be much better for it.

Thanks for reading!

J. Alex Thomas, M.D.

Adogwa O, Elsamadicy AA, Fialkoff J, Cheng J, Karikari IO, Bagley C. Early Ambulation Decreases Length of Hospital Stay, Perioperative Complications and Improves Functional Outcomes in Elderly Patients Undergoing Surgery for Correction of Adult Degenerative Scoliosis. Spine (Phila Pa 1976). 2017 Sep 15;42(18):1420-1425.

Lovecchio F, Jordan Y, Punyala A, Shah S, Lafage R, Charles Elysee J, Sheikh B, Steinhaus M, Ang B, Schwab F, Lafage V, Kim HJ. Timing of inpatient medical complications after adult spinal deformity surgery: early ambulation matters. Spine J. 2023 Feb;23(2):219-226.

Zakaria HM, Bazydlo M, Schultz L, Abdulhak M, Nerenz DR, Chang V, Schwalb JM. Ambulation on Postoperative Day #0 Is Associated With Decreased Morbidity and Adverse Events After Elective Lumbar Spine Surgery: Analysis From the Michigan Spine Surgery Improvement Collaborative (MSSIC). Neurosurgery. 2020 Aug 1;87(2):320-328.

You have a chronic disease.

One of the first articles I wrote for Spinal (con)Fusion was an article explaining adjacent segment degeneration (ASD). This is a dreaded outcome after spinal fusion in which the motion segment adjacent to a previous fusion becomes symptomatic and ultimately requires extension of the fusion to the newly affected level. It’s been almost 10 years since I wrote that article and we still don’t really know why ASD occurs in some patients but not others after fusion. There are some surgical variables that have been clearly associated with the development of ASD (remember, though, that an association doesn’t necessarily imply direct causation). Here’s what I believe to be true:

1. I do believe that the use of open, posterior approaches to the spine versus minimally-invasive, anterior ones can weaken the supporting structures of the spine and thus lead to ASD.
2. I also think that if proper attention isn’t paid to restoring sagittal imbalance (either under- or over- correcting) ASD is likely to occur.
3. Lastly, if the surgeon isn’t careful in placing pedicle screws and violates the facet joint of the level above, that facet joint violation likely leads to ASD.

Readers of Spinal(con)Fusion know that I rarely, if ever, perform open spinal fusions so that takes care of number 1. Also, I’m not perfect but I almost always avoid fusing someone without restoring or at least preserving sagittal balance. Lastly, I rarely violate facet joints while placing percutaneous pedicle screws. Still, though, some of my patients in which I’ve committed none of the above sins still get ASD.

I erroneously used to think that my rate of ASD was quite low. It turns out I just wasn’t following the patients long enough; sometimes it can take decades for ASD to develop. Now that I’ve been in practice in Wilmington for 10 years, I’m starting to see patients come back with ASD. To be fair, when I look at my rate of ASD it’s 4.4% percent across about 1000 fusion patients (slightly higher when the fusion is at L4/5 and above and slightly lower when L5/S1 is included in the construct as I’ll discuss below.) This is still on the very low end of the range of rates of ASD reported in the literature, probably because I am meticulous in avoiding the three factors above (and to some degree I still haven’t followed my patients long enough.) Despite this care, however, patients are still coming in for extension of their fusions. Talk about frustrating!

A deeper dive into my data reveals something else that I’ve been missing that may be leading to cases of ASD: I think I’m not being aggressive enough in treating pathology at L5/S1 when treating pathology at L4/5. When I look at cases only involving XLIF at L4/5 and above, my rate of ASD is 8.7%. For cases in which L5/S1 is included, however, the rate is much lower at 3.0%. What this tells me is that there were some patients in the XLIF cohort that didn’t get a fusion down to the L5/S1 level when they probably should have. To be fair, many of the XLIF patients who developed ASD after their XLIF had their surgery before we developed LALIF for treating L5/S1 with the patient remaining the lateral position (without this excellent treatment option I was probably putting my head in the sand about some L5/S1 levels that should have been treated.) Not all of them though. As part of my minimally-invasive mindset I try to be as targeted with my therapy as possible rather than aggressively fusing every level that is showing even the slightest signs of wear. In a patient who is clearly only symptomatic from a mobile spondylolisthesis at L4/5, for example, I’m likely only going to treat the L4/5 level, even if there’s already some mild wear and tear at L5/S1 (see case below.) Even with the efficient, minimally-invasive LALIF procedure, treating L4/5 and L5/S1 concurrently is more complex, takes longer and is riskier than just treating L4/5 alone. So is the disease at L5/S1 really worth treating given the extra morbidity of the abdominal approach of LALIF? This is what I’m constantly juggling in my mind when I’m talking to patients about fusion at L4/5. It’s a balancing act for sure and there’s no algorithm that clearly guides us here.

Really, though, I think I’ve just been too hard on myself. I used to take it personally when a patient came back in needing an extension of their fusion–I considered it a failure of treatment that I somehow caused. However, my thinking on the subject has evolved dramatically in recent years. Rather than treating diseased motion segments in isolation (and thus beating myself up when a new problem at an adjacent segment arises), I now understand that I’m really just managing a lifelong, progressive condition. The degeneration of your spine is a chronic disease. Just like other chronic diseases there are things you can do to slow or even halt the progression of the disease. Things like weight control, core stability and weight-bearing exercise are arguably more important in the treatment of your disease than anything I can do for you. In the end, though, it may catch up with you anyway, whether you’ve had a fusion or not. Does a previous fusion accelerate degeneration at adjacent levels? Probably. In my opinion, though, given the chronic, progressive nature of degenerative disc disease, the degeneration of the segment was likely to happen anyway. So is it not worth getting the initial fusion in the first place even if it’s only going to buy you, say, 5 more years of significantly reduced pain before you may require another fusion? This is a tough question that many of my patients struggle with. In the end, I’m here to try to manage the flare ups of this chronic disease. This is a balancing act between sufficiently putting out the fires when they arise and not exacerbating the problem with overly aggressive treatments. On good days this feels like I’m elegantly threading a needle, on other days it just feels like a game of Whac-A-Mole.

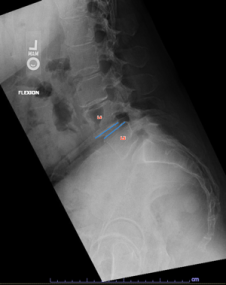
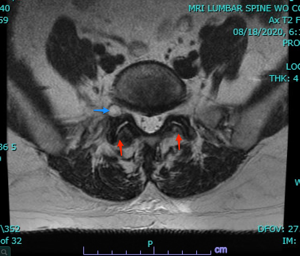
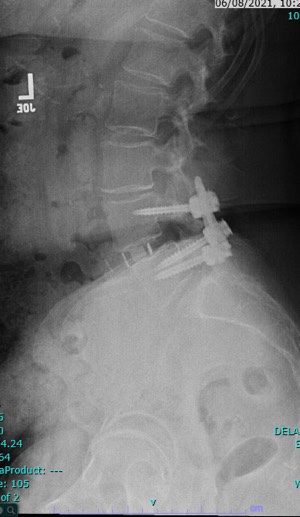
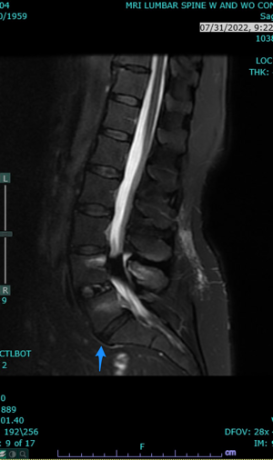
I’ll close with a case presentation of a patient that I just saw last week. The patient is a 63-year old female who is a nurse at one of our local hospitals. She’s an awesome patient: extremely motivated, energetic and knowledgeable about what ails her. She presented in early 2021 with about 1 year of worsening pain in her right leg. I felt that this pain was secondary to the severe foraminal stenosis associated with an unstable spondylolisthesis at L4/5. (See figure 1) In addition to her spondylolisthesis she also had early degeneration at the L5/S1 level, particularly on the right side where she also had a facet cyst indicative of advanced arthritis in the facet joint. (See figure 2) I was a bit nervous about just doing a fusion at L4/5 and leaving L5/S1 alone. We talked it over together and, as I always do, I involved her in the decision-making process. She understood that there potentially could be an issue at L5/S1 down the road but also understood the potential downsides of the abdominal approach needed to properly fix L5/S1 concurrently. In the end we both decided that we’d just fix the level causing her immediate symptoms and keep our fingers crossed that L5/S1 would hold. She felt that she’d be able to bounce back and get back to work more quickly after just a one-level fusion. We did an XLIF and perc screws at L4/5 in March 2021 and she did great. (See figure 3) She went home the next morning with near complete resolution of her leg pain. She progressed very well and was essentially pain free…for about 16 months. Unfortunately, in late summer 2022 she began having back pain as well as a new pain in the posterior aspect of the right leg (a different nerve distribution than previously.) Updated imaging reveals severe degeneration of the facets at L5/S1 with a spondylolisthesis. (See figure 4) Frankly, I was shocked at how quickly this degeneration had progressed (her routine post-op CT scan, when she wasn’t having any pain, actually showed the early slippage at L5/S1, see figure 5.) She’s just agreed to have an extension of her fusion down to L5/S1 and will undergo the procedure in the coming weeks. What does this case show us? Well first it shows that ASD can develop rather quickly in some rare cases. Second, it highlights the notion that perhaps I need to be more aggressive in recommending surgery at L5/S1 in addition to L4/5. Lastly, it shows that sometimes ASD just happens. Even without the fusion I’m certain that, as quickly as it degenerated, the L5/S1 level was already compromised and was likely going to degenerate to the point of needing surgery anyway. What she probably needed was a L4-S1 fusion but she doesn’t regret initial surgical plan at all. She made an informed decision about the right treatment for her at the time and she was able to live pain-free for nearly a year and a half. She’ll do great after her extension and hopefully won’t require any further surgery.

Sagittal T2 PreAxial L4 5 PrePreop Flex Ex

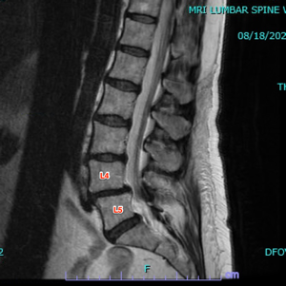
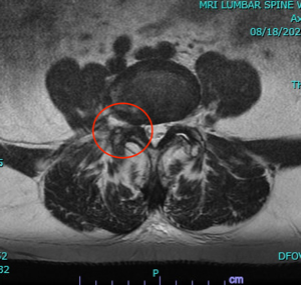
Figure 1: Preoperative sagittal (left) and axial (center) MRI images showing grade I spondylolisthesis at L4/5.  Axial images shows severe right facet hypertrophy at resultant foramina stenosis (red circle). Flexion X-rays show worsening of the spondylolisthesis with flexion (blue lines, right image).

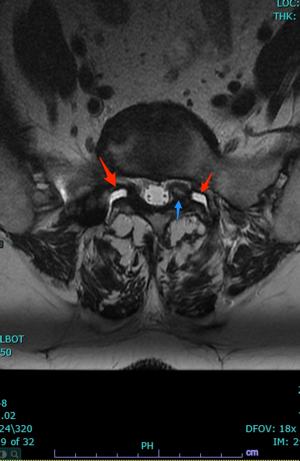
Axial L5 S1 Pre

Figure 2: Preoperative axial MRI at L5/S1 level showing mild facet arthritis (red arrows) and R-sided foraminal facet cyst (blue arrow).  

Postop lateral Xray

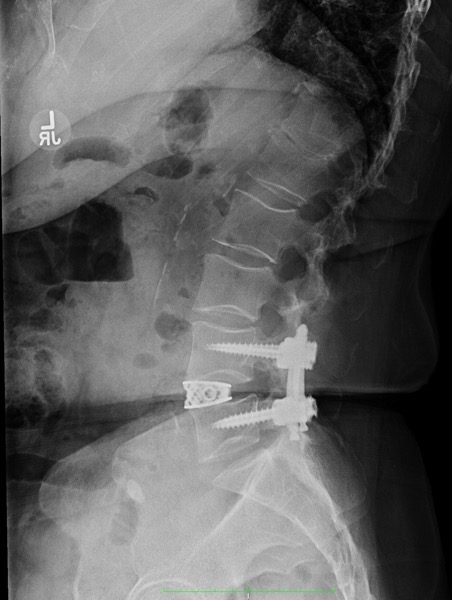
Figure 3: postoperative lateral Xray showing XLIF spacer and pedicle screws in good position with reduction of spondylolisthesis.  

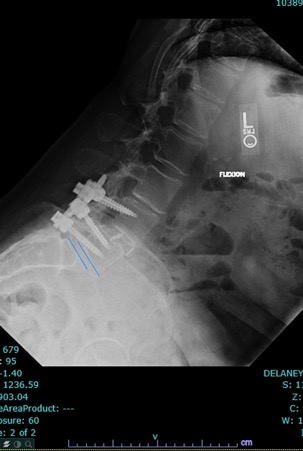
Viewer v5 7 245US Internet Explorer 2 2Viewer v5 7 245US Internet Explorer 2Viewer v5 7 245US Internet Explorer 3

Figure 4: Updated sagittal and axial MRI (left and center images) showing severe degeneration at L5/S1.  On the axial image note the severe facet arthritis (red arrows) and new left sided facet-cyst (blue arrow).  If it weren’t for the hardware at L4/5 I wouldn’t have believed it was the same patient.  Flexion Xray (right) show worsening of the spondylolisthesis at L5/S1 on flexion (blue lines)

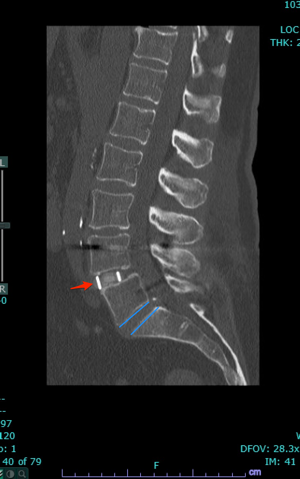
.6 month CT

Figure 5: 6-month postoperative CT scan showing XLIF spacer in good position at L4/5 (red arrow) but also now a slight spondylolisthesis developing at L5/S1 (blue line on the bottom of L5 is sliding forward slightly compared to the blue line at the top of S1).

Thanks for reading,

J. Alex Thomas, M.D.

Lateral pedicle screw fixation is the foundation of lateral single-position surgery.

The vast majority of pedicle screws are placed with the patient face down or in the prone position. First of all, most fusions done in the US are the awful posterior fusions such as the transforaminal lumbar interbody fusion (TLIF) or the posterior lumbar interbody fusion (PLIF). These involve spacers being placed through narrow posterior (from the back) corridors so the patient is already positioned prone when it’s time to place pedicle screws. As we’ve discussed previously, I don’t perform these procedures because you can’t deliver a large spacer using TLIF/PLIF like you can with XLIF/ALIF. (Remember, bigger is better when it comes to intervertebral spacers: the larger the spacer the better the: a)foraminal/disc space height correction, b) deformity correction and c) fusion rates.)

Even for the surgeons that have committed to doing XLIF, though, most of them will complete the lateral portion of the case, close the incision and then reposition the patient from the lateral to the prone position to place screws. The reason for this, simply, is that this is what is familiar to surgeons—classically, surgeons have always been taught to place screws with the patient prone. I placed screws this way for the first few years of my career because, frankly, this is the way I was taught to do it and thus I thought it was the best way to do it. (Herein lies a huge problem in the way that surgeons think: they often are afraid to try new, better ways of doing a procedure because they learned one way to do that procedure, they’ve done it that way many times, their results are OK and thus they’re hesitant to consider alternatives. They get too comfortable.) I would do the XLIF, close the flank incision, take down all the drapes, flip the patient to a second OR table, re-prep, re-drape and then start the screw portion of the case. Even with me in the room directing traffic this process commonly took at least 45 extra minutes. That’s 45 extra minutes of time under anesthesia for the patient! Also, it’s just inherently risky moving a patient around while they’re asleep!

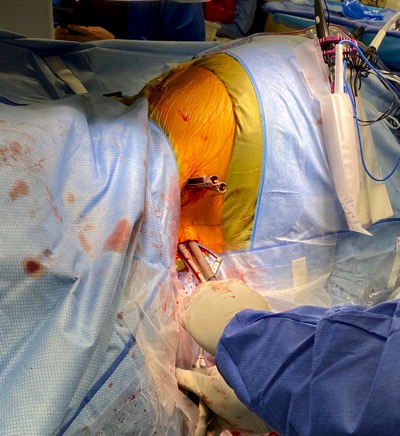
In late 2013, though, during an XLIF at L4/5 I decided that I would keep the patient in the lateral position rather than repositioning prone for the pedicle screws. I figured it’d be challenging but I knew that if I couldn’t make it work in the lateral position I could just abort and flip to the familiar prone position. Honestly, I thought it was going to be a lot more difficult than it actually was. It took us about 15 minutes to place 4 screws that day and since then I’ve never flipped a patient to place screws again. Now, because we’re not wasting time flipping the patient we will routinely perform a single-level XLIF with four screws in under an hour. When we were flipping patients it would take us twice that long. See figure 1.

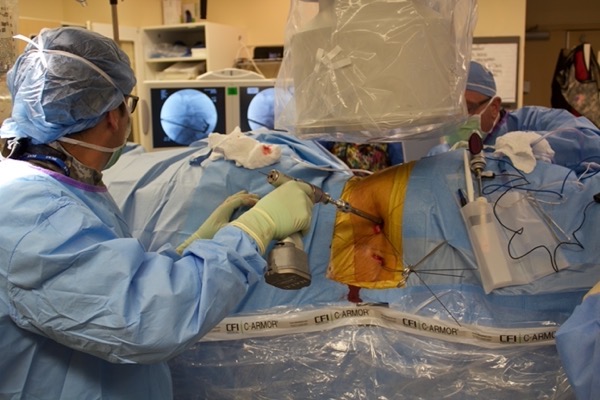
Power drill lateral screws

Figure 1: Placing percutaneous pedicle screws after a lateral fusion.  Another benefit of placing screws this way is that someone can work on the anterior side of the patient at the same time.  

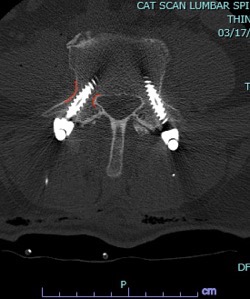
Some surgeons told me that they thought that by placing screws in the unfamiliar lateral position we’d surely have more complications. They thought that we’d see higher rates of infection or screw malpositioning. That just hasn’t been the case though. We published our experience with our first 300 screws in the journal Spine in 2018 and we showed that placing screws in the lateral position is very safe with a complication rate similar to that reported in series of screws placed the traditional way. More importantly, we showed a massive increase in OR efficiency when we stopped wasting time repositioning the patient. Since then, we’ve placed nearly two thousand pedicle screws this way with a near zero complication rate. See figure 

Screen Shot 2022 07 02 at 3 08 28 PM 

Figure 2: Our paper describing our initial experience placing pedicle screws in the lateral decubitus position after lumbar fusion.  This study was the first of its kind and showed that placing screws this way was much faster and just as safe as when they’re placed in the traditional prone position.  

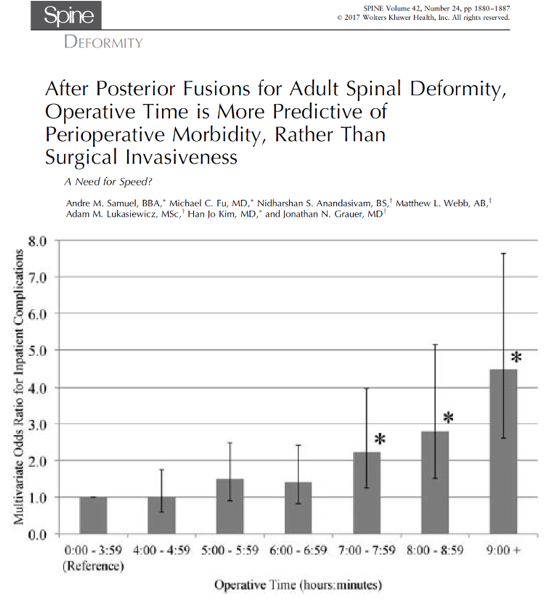
So why do this? Increased OR efficiency isn’t about doing the case faster so that I can get to the golf course sooner (I’m not a golfer actually.) This is about what’s better for the patient. Speed matters. Several large database studies have shown that decreased OR time directly translates into less surgical risk for the patient. In one study of over 1500 patients undergoing surgery to correct spinal deformity, researchers found that only operative time, not case complexity or number of levels fused, correlated with increased risk of surgical complications. (Samuel et al, 2017, see figure 3) In another study of nearly 500 patients increased found that each independent hour of extra operative time correlated with a linear increase in the rate of several complications including need for transfusion, postoperative thromboembolism, urinary tract infection and overall complication rate. (Hersey et al, 2019). These and other studies demonstrate the need for surgical efficiency when trying to optimize patient outcomes after spinal fusion. 

UntitledImage

Figure 3: 2017 Yale study of NSQIP database of over 1500 patients undergoing fusion for spinal deformity.  Notice the direct linear increase in complication rate with each hour of operative time.  The authors ponder “A need for Speed?” in these cases.

Along with XLIF, placing screws with the patient remaining in the lateral position is a foundational “pillar” of the strategy of lateral single-position surgery (LSPS) of the spine. (Another pillar, the use of ALIF in the lateral position at L5/S1, was developed more recently and will be discussed in a future post.) I truly believe that LSPS is the absolute best way to perform a spinal fusion and thus I spend a lot of time teaching our lateral screw technique to surgeons around the world. Can you believe that there are still surgeons out there who are skeptical of the need to place screws this way? They wonder why we’d want to change the paradigm for placing pedicle screws. If the prone position is more familiar to the surgeon it must be better for the patient right? Wrong. We shouldn’t settle for surgery that is familiar to the surgeon… we must strive to make surgery better for the patient. Placing screws in the lateral position is better for the patient. It’s not just about being faster, it’s about doing all of the necessary steps of the surgery in the most efficient manner possible. This increased efficiency translates into decreased surgical risk and improved patient outcomes. That is why we do it.

Thanks for reading!

J. Alex Thomas, M.D.

UntitledImage

Maverick and Goose probably would have been good spine surgeons. 

 Sources:

1. Hersey, A. E., Durand, W. M., Eltorai, A. E. M., DePasse, J. M., & Daniels, A. H. (2019). Longer Operative Time in Elderly Patients Undergoing Posterior Lumbar Fusion Is Independently Associated With Increased Complication Rate. Global Spine Journal, 9(2), 179–184.

2.Samuel, A. M., Fu, M. C., Anandasivam, N. S., Webb, M. L., Lukasiewicz, A. M., Kim, H. J., & Grauer, J. N. (2017). After Posterior Fusions for Adult Spinal Deformity, Operative Time is More Predictive of Perioperative Morbidity, Rather Than Surgical Invasiveness. Spine.

XLIF from a patient’s perspective

I’m humble for a neurosurgeon, but one thing I think I’m really good at is counseling patients about surgery.  I go to great lengths to be sure that the patient understands exactly what is going to happen to them during and after their surgery.  I take plenty of time, use plain language and even use images and diagrams to explain the process.  With all this effort and thoroughness my patients surely comprehend every facet of their surgery and recovery, right?  Wrong.  Despite my best efforts, patients have a tough time remembering  what was said in pre-surgical discussions.  I may think I’ve done a good job at explaining all the potential issues they may face in the first few weeks after surgery but they’re almost certainly not going to remember what I said.  Then, when things do get tough, because they will, they’re going to feel scared, alone and maybe even mad at me (I half-jokingly tell every fusion patient they’re going to hate me for the first few weeks after surgery). 

Every so often a patient tells me that I should write an article for Spinal (con)Fusion better explaining the patient experience after a surgery like XLIF.  They’ll say that despite all my explanation pre-op they just weren’t prepared for the first few weeks after surgery.  I kept putting this off until recently a patient, we’ll call her June, offered to keep a journal of her experiences after her XLIF at L4/5.  She altruistically kept detailed records to help the next patient who has this procedure.  Below are those journal entries.  I’ve omitted some extraneous material but for the most part have included all that she’s written (written in italics).  When appropriate I’ve added some context at the end of each entry.  These entries cover the first month or so of June’s recovery to please bear with the length of this post.

DAY 1-16: I am a recovering patient of Dr. Thomas’s (female, age 74 in generally good health) and I had my surgery on December 17, 2021. My procedure was XLIF L4-L5, posterior lateral fusion L4-L5 w/percutaneous pedicle screw fixation.”“My first office visit
with Dr. Thomas was thorough and relaxed.  I had prepared a list of questions and he was wonderful about answering all of them.  He asked me numerous times if he had answered everything, never seeming to be in a hurry to move on to another patient.  Our meeting lasted only about 20 minutes, but I came away knowing that I had made the right decision.”

“From the minute I woke up from the surgery, after my prayer of Thanksgiving, I was in a good deal of pain- mostly in the surgical site areas.  I was quickly whisked into the recovery room where a wonderful nurse named “Deborah” latched on to me and stayed with me for many hours until I was moved to my room for over-night.  She administered pain meds until both she and I were satisfied that I was finally comfortable.  This took only a few minutes and the drugs were given via IV. I never really felt groggy or sleepy, but I think it was just my adrenaline.”

“I had a long wait for my hospital room, but I am so fortunate to have a loving husband who was waiting there for me and to spend the night with me.  My first time up out of the hospital bed which was aided by a nurse and my husband, AND the hand rails on the bed, was quite challenging. However, I immediately noticed a promise from Dr. Thomas kept!  The horrible pain down both my legs that I’d been living with for the past 5 or 6 years was completely gone!!!   Yes, there was certainly surgical pain and weakness of my body, but that particular pain was nowhere to be found.  I am so elated and dreaming of my days of longer walks and all kinds of things I have not done in such a long time!!”—This is fairly typical of XLIF surgery for radicular pain.  Yes there is pain at the incision sites and with hip flexion (from local psoas trauma) but typically, any nerve pain in the legs that was there preop is gone when the patient wakes up. 

“We anticipated a short-staff situation at the hospital and we were correct.  Any movements that I made had to be assisted (mostly getting out of bed for the bathroom), but I was able to walk with a walker and his support.  He never left my side and I think that it’s absolutely necessary for you to have someone with you for an overnight stay after surgery.  We had no real issues, but you need that sense of safety and security.”—This is great advice. With the staffing issues at our hospital these days (and at just about every hospital in the country) the nurses are sometimes just spread too thin to ambulate my postop patients as much as I’d like. I can’t stress how important it is to get up out of bed IMMEDIATELY after surgery and start walking; the more the patient can walk that first day, the better.  If a family member is present, they can assist with ambulating their loved one. 

“This is a time to mention the side rails on the hospital bed.  Only when I got home to my normal bed, which isn’t excessively high off the floor, I realized how much I had used those rails in the hospital and did not now have them.  I worked out a system with my husband, my bedside table, and then getting to my walker right away.  If you are more frail or infirm, you might want to rent some of these bed rails. 
They are available. You should not need them for too long, but it depends on you!”—The physical therapists will see XLIF patients before they are discharged to help assess whether or not any equipment like this will be necessary in the first few weeks after surgery.

“I was given pain meds thru the night and kept comfortable for my entire stay.  I had to wait the next day for an x-ray of my spine before I could be released and due to the staff shortage, this took several hours just to get me rolled down to x-ray and back to my room.  A physical therapist came in before we left and gave us both detailed instructions on how I should get in and out of bed, and how I should climb a few stairs to get into my home. The doctor on-call that day was true to his word and discharged me the minute he could.  It was about 6:00 pm and it was a Saturday.  DO NOT leave the hospital without a walker and a ‘grabber’.  You can’t bend at all, and they are a life-saver! 
At home, wear pjs or comfortable, loose clothing, and shoes you can just slide your feet in.  You won’t be able to tie laces for a while!  You will have good days and bad days, especially the first two weeks.  Try not to get discouraged because it is all going to be worth it in the end!!”

“The IV drugs kept me very comfortable.  and I remember getting into my car, then my home, then my bed, and thinking- “hmmm, I think I’ve got this!”  But do be smart about this.  For the first few days I was in a tremendous amount of pain. Everything that I did when I moved, hurt.  I hurt all over!  I pride myself on being ‘tough’ and started out pushing the pain meds out to the limit, taking much less than was prescribed.  So it wasn’t long before I was very uncomfortable.  I soon learned to take more meds and stay ahead of the pain. 
Also, forcing myself to get up and walk around when I really didn’t want to.  I was always glad afterwards, even if very tired.  I walked a little more each day and because we had nice weather, I walked outside about day 4 or 5.  It was a slow, 15-20 minute walk.”—Sometimes patients will tell me that they don’t want to take the prescribed opioid pain meds because they’re afraid “of getting addicted”.  June is so right here. You have to stay ahead of the pain in the first few days because if you get behind it can be very tough to get back on top of it.  Take the meds until you’re certain you don’t need them!  And you have to make yourself walk!!!

“A side effect of narcotics is constipation, which is not normal for me, so the first few days of my recovery were complicated by this most uncomfortable feeling.  I got help from my medical doctor for this issue and it took about two days to resolve.  My best advice is to start taking MiraLAX or whatever works for you the very minute you get home.  You are already pumped full of narcotics, and the stool softeners they give you at the hospital had no effect on me.  Continue Miralax or similar as long as you are taking any narcotics.  Medical staff will confirm this!!”—Another great point here.  Constipation will make a tough recovery so much tougher!

“You will have good days and bad days, especially the first two weeks of recovery.  Having food available is very important, so plan ahead for that.  Hopefully, you will have someone that can prepare good food for you at least the first week or so.  And, if you are a ‘napper’, have your caregiver rest when you do.  They will need it!  Try not to get discouraged because it is all going to be worth it in the end!!”—What about your surgeon??  I love naps too!

“My first very surprising pain that I do not recall reading about was a muscle spasm in the psoas muscle of my right leg. This is the muscle that Dr. Thomas dilates in order to get to L4-L5.  The spasm was one of the worst pains I have ever experienced.  It lasted a good 15-20 minutes and was terrifying because at the time, I just didn’t know what was happening.  My husband comforted me as I swallowed every type of pain medication available to me which was Tylenol, Dilaudid, Robaxin (muscle relaxer), and Xanax!  It finally subsided but left that area of my leg very sore for the next several days. The next morning I phoned Dr. Thomas’s office and Laura Ivey, P.A. was able to speak with me immediately.  She eased my worries as soon as she mentioned the ‘psoas muscle’, because I then knew exactly what she was talking about! She urged me to take more pain meds, but that fear of constipation remained looming. Hate it!!! So far, I have had only one, additional, psoas muscle spasm- just as bad as the first one!  Unfortunately there is no way to predict if or when these will come.”—This is why I always tell patients that there will be good days and bad days over the first few weeks after surgery.  Just when you think you’re in the clear, BAM you encounter a bump in the road.  True spasms of the psoas like June had thankfully aren’t that common but psoas pain after XLIF can definitely happen, particularly when the patient tries to flex their hip (like when getting in and out of bed or a car.)  This is just surgical pain from psoas dilation, it does not indicate that anything bad is happening and usually is quite short-lived.

“The next ‘surprise’ paincame a few days later when I felt a very strong nerve type pain from my waist through my left buttocks, and all the way down my left leg.  It was very similar to the pain I’ve been living with for years, but much, much, more intense.  I would say excruciating, unbearable.  I tried to wait it out but ended up taking the narcotic.  This pain is too much to deal with on your own or with Tylenol.  Although I was seeing Dr. Laura Ivey in one more day, I called the office because I knew I could not survive a long time of this kind of pain and suffering.  The very helpful triage nurse, Melissa, (who also was available right away), explained that these were the nerves in my body ‘waking up’ and that it was indeed going to be extremely painful.  Steroids are most helpful when this happens, and they called some into my drug store immediately.  I was so grateful and impressed that I made that call at 9:00 AM, spoke to them, got notified by my drug store, my husband picked up, and I had the meds in my hand by 11:00 AM the same morning.  I was astonished at this great attention that I was receiving.  We all know this is how it SHOULD be, but not always how it is!! I saw Dr. Laura the next day in the office.  It was 13 days after my surgery.  I was having a pretty good day and she took her time with me, and we discussed the steroids and how I could modify the dosage (while still taking pain meds and muscle relaxer) since the side effects are very hard on me.”—Transient nerve pains in the legs after any lumbar surgery are not unusual.  These pains often resolve spontaneously but sometimes a short course of oral steroids is needed.

“DAY 17 – I am now 17 days from surgery.  Each day is pretty much different although I seem to have the very painful ‘nerves waking up’ pain every morning.  It starts about 3 or 4 AM, wakes me up, I take the narcotics at that time.  But it still takes up to 5 hours for it to go away. I am not taking the full dose of steroids because of the side effects, so this is why it’s taking a little longer to get control of this nerve pain. I am just working thru all of it as best I can.  I am following Dr. Thomas’s instructions to the letter about walking and being as active as I can with the NO BLT restrictions.  I am unclear how much longer I’ll have this nerve pain.  Once the nerve pain resolves, I start to feel more ‘normal’. This makes the afternoons and evenings usually pretty good.  I am up to 30-40 minute walks now, once my nerve pain is gone, although I prefer to go slowly and very carefully.  Not taking any chances!!! ” 

“The first two weeks are by far the worst and having someone with you is absolutely essential. Again, I am so fortunate to have my husband here with me all the time.  The first two days I did get up and walk around the house but was in bed otherwise.  Getting comfortable in one’s bed is a bit of an ordeal. There is not unbearable pain, but there is a lot of fear of hurting oneself or causing a problem with the pedicle screw fixation.  On the third day home, I came into the living room and did not return to bed any more until nighttime.  I have no trouble sitting but getting comfortable can be challenging. Some of the mornings when my nerve pain is horrible, I stay in bed longer.  But I have been walking 20-30 minutes every day.  Mostly outside.  I used the walker in the house about 5 days.  When we walk outside, I just hang on to my hubby!”

“I have been able to prepare a few very simple meals with help but learning to understand my limits.  When I get tired, I quickly sit down and rest.  I do experience the results of moving and walking, however.  At first, it’s really hard, but you always feel much better afterwards.  Even with those excruciating pains, ‘walking’ them out helps.  Moving is the key.  (p.s. I am not an ‘exerciser’, but I was a walker at least 5 days a week until about 2 years ago when my back pain controlled my life.  I retired from an extremely active job just two years ago (owned a flower shop!) The pain made me retire!!! I am totally optimistic and focused on getting back to being more active.  Walking and bike riding are my two favorite activities outside.”—One thing I hear a lot from patients is that they’re afraid that they’re going to “knock something loose” like the pedicle screws mentioned in this section of the journal.  While I have seen some hardware (mainly the spacer and never the screws) shift in the first month or two after surgery, this is exceptionally rare. Patients should rest comfortably knowing that it would take a tremendous force to dislodge their hardware (I had a patient who was involved in a car accident and nothing happened to the hardware.)  June is right here: moving is the key in the first few weeks after surgery!!

“DAY 18– Slightly better night with about 7 hours straight sleep.  No drugs taken until 6 AM (last ones were 10:30 PM) which was Tylenol and muscle relaxer, steroid, and one Dilaudid for the nerve pain which still was present but came on a little later this morning.  It is also slightly less severe.  I continue to take the Miralax once a day as long as I’m using the Dilaudid, a narcotic.  It is keeping the constipation at bay but gives you a sort of ‘full’ feeling all day. The steroids which I needed to increase, make me feel jittery and hungry all day too.   What can I say? I trust my doctor!! Onward and upward.  I know this is temporary for now and going to get BETTER!”—It is imperative that patients take stool softeners while taking pain medications after surgery.  A bout of severe constipation will really derail a patient’s recovery!

“DAY 19-Ok! So, coming off a great day like yesterday, the sad truth is that I was hit this morning at 3:30 AM by the strongest, most intense, ‘nerves waking up’ pain since my surgery!!! I’ve never actually been ‘on fire’.  But that is what I imagine when I feel this pain.  It starts on the left side of my surgical site in my low back and travels all the way down my leg.  It is constant and grows in intensity.  At first inkling of this, I got up as quickly as possible and took one Dilaudid, 2 Tylenol, one steroid tablet, and 1 Robaxin (muscle relaxer). 
I waited two hours with no relief.  I got up and tried walking all around the house, still no relief.  At 9 AM I still had no real relief.  So, I repeated all the same medicines but this time I took three Tylenol in the mix and continued to walk around the house to see if that would help.   About two hours later, I began to feel about a 20 per cent reduction of the intensity of the pain.   It’s 3 PM now and I continue to feel sore and exhausted. Never have been back to sleep.   I’ve done very little except the ‘house’ walking and got a shower.  No need to call Dr. Laura, I know what this is, but today has been the worst. ☹ It’s amazing how excruciating pain can affect a person.  Can’t wait for tomorrow because it HAS to be better!”—More waxing and waning of symptoms here.  Again, this is totally normal in the first few weeks after surgery.  Thankfully June has seen this before and isn’t too concerned about it.  I truly believe it’s this positive outlook that has been key to her good recovery so far.

“DAY 22-To update from Day 19, the past two days have been much improved.  I have had many hours of zero nerve pain; however, I did experience a long-lasting period of nerve pain in the same area of my left leg last night starting around 8 pm.  It started to grow in intensity so I took a Dilaudid at 9 pm, along with Tylenol and Robaxin. At 10 I took my .01mg Xanax.  It took me several hours, but I was able to finally fall asleep around midnight without taking additional meds until 2 AM.  I woke again for the bathroom and took more Tylenol, Robaxin, and one steroid at that time.  This morning I have slight discomfort in the left leg radiating from the hip joint, on left side of my body.  I’m up and moving around and plan to have a good day! My wish is to have a discussion with Dr. Laura Ivey or Dr. Thomas about this nerve pain.  Is my problem a normal one? Will this be on-going and for how long? Is there anything that I can do to make it stop? Am I doing something to bring it on?“—Here we see the nerve pain starting to improve a bit.  Every patient’s recovery from XLIF is different and I can’t say that June’s “nerve pain” is typical. We’ve seen just about every unusual new neurological symptom after XLIF, though, and I’m no longer surprised when a patient hits a bump in the road like this.  Thankfully these new symptoms are almost always very self-limited (and almost always respond to some oral steroids) and don’t affect long-term outcome.

“DAY 28- I thought this would be a good day to write an update on my recovery as I am just three days away from a full month after my spine fusion surgery.  I awoke with a feeling of tremendous gratefulness to God, Dr. Thomas, his entire staff, my husband and all my supportive friends and family!  I had a big bunch of flowers to arrange after breakfast which always makes me SO happy! I know that the worst is
all behind me and I am so happy that I was able to get my surgery in mid-December and it’s OVER! If not, I might still be waiting for the January 29th date that was given to me originally.”

“I have one more full month of very restrictive movements as far as bending, twisting and lifting goes. I’ve been very good about following those orders and my husband watches me like a hawk if I accidentally start to make a little ‘slip’. But I have been walking
outside with my husband every day for a minimum of 30 minutes.  It has been cold, but mostly sunny and the walks are sometimes challenging but always give me a feeling of accomplishment.  I find that when the cold air hits my body, I get a dull ache at the surgical site on my back, but it is far from debilitating.  I’m sure this is a temporary effect and if it lingers after the walk, two Tylenol tablets is all I need to get rid of the very slight pain.  I don’t even need Tylenol every day.  At this point, I am not taking any prescribed pain medications, muscle relaxers, MiraLAX or laxatives.  Everything is working ‘normally’, and I really feel good!” 

“I am cooking several meals a week now which makes my husband very happy. I have always loved to cook, and this is another way I feel a sense of accomplishment.  One unexpected result of my surgery and recovery experience is that my husband and I have grown closer- even after 37 years of marriage!!!! We have been together pretty much 24/7 since all this started and while I tell him daily how much I appreciate him; he is also full of praise for my daily progress and reminds me how proud he is of me and how much he loves me.”—Honestly June and her husband are the sweetest. 

“I will be getting an x-ray in about 10 more days and will see Dr. Laura Ivey as a follow up to that. I am anxious for that report, but expect only good news!  I have a friend in my own neighborhood who has already been through a similar surgery already twice (not from Dr. Thomas) and he has not had a good result.  I have urged him to get a second opinion from Dr. Thomas as his next step.”

“Day 80– Yes! Day 80!!! After recently reviewing my previous blog entries, I think it is important to share the great progress that I’ve made since my last entry.  Re-reading the first few weeks of struggle and pain, seems much longer ago than it actually is.  While I understand that my procedure does require six months for a full recovery, I can say that my husband and I feel that at the almost 3 month mark, I am very close to mostly normal activities.  On rare occasions, I require a muscle relaxer after working in my garden because of back pain, but otherwise, I am not taking any prescription or OTC drugs. My greatest ‘problem’ is worrying that I’ll make a move or take a fall that might damage Dr. Thomas’s excellent surgical procedure that corrected my spondylolisthesis.  A week ago, I was able to have a 3-day weekend in Charleston with my adult granddaughter.  We took long walking tours as well as stopped in as many shops as time allowed.  A short 4 months ago, this would have been an impossible activity for me because of the extreme leg and back pain that I had on a daily basis.” 

“It goes without saying that I really feel that I have my life back, which is exactly what I asked Dr. Thomas for on our first meeting.  Another patient of Dr. Thomas’ told me that after surgery, he felt he had taken a ‘magic pill’.  While I remain careful, and cautiously optimistic, I am making the most of every ‘magic’, and pain free moment of every day! I am considering returning to some type of work on a part-time basis as well.  I want to be as productive as possible!!”

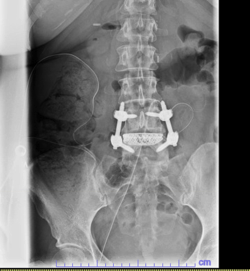
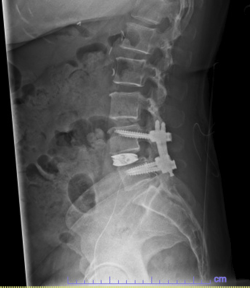
There you have it, a very detailed account of what it’s like in the first couple of months after XLIF.  June clearly hit some bumps along the way in her recovery.  New (often debilitating) neurological symptoms are not uncommon in the first few weeks after XLIF.  That can happen when reconstructing one’s spine and undoing years of degenerative damage.  As June demonstrated, though, the key is to not get discouraged by the short-term setbacks and to focus on the long-term result.  In the end, because of her amazingly positive outlook, June had an excellent recovery after her XLIF.  I’m so proud of her and am thrilled to share her story. (See figures 1 and 2)
LATERAL 114122LATERAL 85639

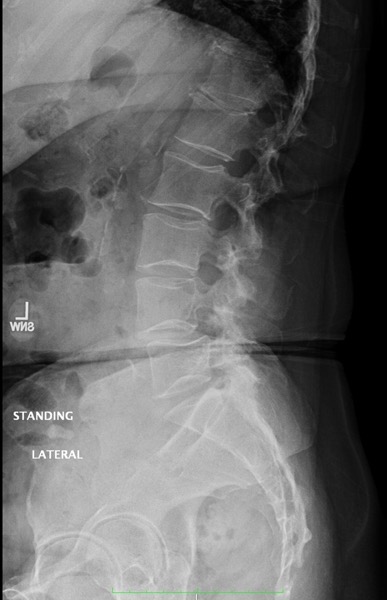
Figure 1: Pre- and postoperative Xrays showing a complete reduction of June’s spondylolisthesis at L4/5. Note the spacer and pedicle screws implanted during XLIF.
IMG 8444

Figure 2: One happy patient!  She made it look easy!

Thanks for reading!

J. Alex Thomas, M.D.
Single-position surgery finally gets its due.

I recently returned from the 2021 Society for Minimally Invasive Spine Surgery (SMISS) meeting in Las Vegas.  This meeting, dedicated to advanced, innovative topics in minimally-invasive and lateral access spinal surgery, is probably the best meeting of the year for minimally-invasive spine (MIS) surgeons (i.e. the only type of spine surgeon you should ever visit.)  Our group presented three very important studies on single-position surgical (SPS) strategies in spine surgery (a group is typically allowed to present no more than two studies but the meeting organizers allowed an extra presentation only for our group given the strength of our data (as presented by the outstanding 6th year NYU neurosurgical resident Kimberly Ashayeri, MD, see image 1.)  5 years ago, when my friend Brian Kwon and I were the only surgeons talking about SPS at these meetings, to say that it wasn’t received positively would be very generous (I still vividly remember getting yelled at by some of the most renowned MIS surgeons).  A few years later when we were the first to use the term “single-position” in the spine literature it still didn’t get much attention.  Now, it seems like all anyone wanted to talk about this year at the SMISS meeting was SPS in one form or another.  With our presentations at the meeting and recent related major publications we continue to demonstrate the tremendous power and value of SPS.  And now everyone is paying attention. 

IMG 7748

Image 1: NYU neurosurgery resident Kimbery Ashayeri presents our 1-year data comparing SPS techniques with traditional dual-position techniques at the 2021 SMISS meeting.  

Briefly, single-position surgery (SPS) is an emerging concept that describes a surgical strategy that allows the placement of large
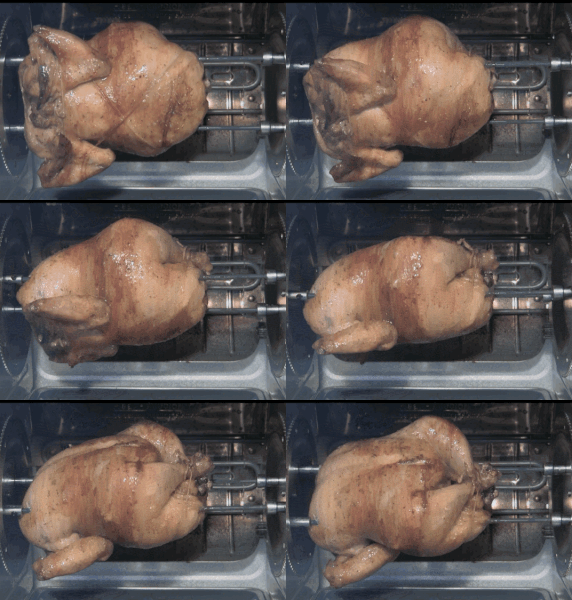
spacers in the front of the spine and pedicle screw fixation at the back of the spine all without repositioning the patient.  Traditionally, after an XLIF the surgeon would close the flank incision and the patient would then be positioned prone (face down) for placement of the pedicle screws (surgeons are classically taught to place pedicle screws in the prone position so this is more familiar to them).  This subjects the patient to significantly more anesthesia time for each “flip”, not to mention the increased risks of moving an a patient who’s asleep (i.e. inadvertently pulling out the breathing tube or IVs.)  If the surgeon also wishes to do an anterior lumbar interbody fusion (ALIF) at L5/S1, which is traditionally done with the patient in the supine position (on their back), prior to the XLIF at L4/5 that’s one more “flip” for the patient.  Patients with degenerative pathology of their spine commonly need fusion from L4-S1. Think about how long that could take:  ALIF at L5/S1, close, flip; XLIF at L4/5, close, flip; bilateral pedicle screw fixation, close.  Spine surgeons call this the rotisserie and it can take hours (see image 2). Using SPS, however, we are now able to do these cases in 70-90 minutes.  The surgeon no longer must sacrifice placing a large intervertebral spacer for the sake of expediency (as in the abominable TLIF procedure).  (See image 3)

Rotisserie

Image 2: traditional anterior-posterior spinal procedures can involve multiple “flips” between stages of the surgery.  This results in more time under anesthesia and thus increased risk for the patient.  

IMG 7792

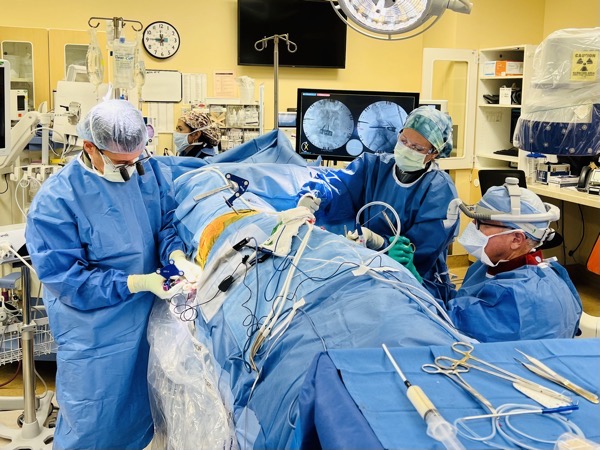
Image 3: Another benefit of keeping the patient in the lateral position for the entirety of the case is that you have concurrent access to the front and back of the patient.  Here, our approach surgeon Dr. Medley (right of screen) completes the abdominal portion of the case at the front of the patient while I place pedicle screw fixation at the back of the patient (left of screen).  By working simultaneously during these case we are able to save the patient over an hour of time under anesthesia.

Not since the advent of XLIF have I seen such a game-changer as SPS and it was pioneered in large part by us right here in Wilmington, NC (cue Southern accent: “I’m just a small-town country neurosurgeon…”).  Anyone who has read my posts on Spinal(con)Fusion knows that I never use this as a forum for self-promotion and that’s not what I’m doing here.  Not all spine surgery is the same, though, and my mission is to make sure patients know that.  SPS is changing spinal fusion surgery and patients right here in the Eastern North Carolina have been some of the first to benefit.

The next several posts are going to be dedicated to discussing single-position surgery. We’ll discuss how the concept was first conceived to simply save OR time during XLIF procedures.  We’ll discuss how we solved the issue of access to L5/S1 while keeping the patient in the lateral position. Lastly, we’ll discuss the evidence from several large multi-center studies (for which we contributed a significant amount of patient data) that demonstrates that not only does SPS dramatically improve OR efficiency but that this increased efficiency leads to significantly improved patient outcomes.  It’s been quite the journey and I can’t wait to tell you about it.

Thanks for reading.

J. Alex Thomas, M.D.

Losing weight is simple.


Patient: “I need back surgery.”

Me: “You need to lose weight before it will safe for you to have back surgery.”

Patient: “I can’t lose weight because I can’t exercise.”

Me: “Well how much are you eating a day?”

Patient: <<blank stare>>


I’m taking a break from the technical posts so that I can go back on my soap box for just a bit.  I want to talk more about obesity and spine surgery. A couple of years ago (for the very dedicated Spinal (con)Fusion readers) I wrote a post about a gentleman who put in a ton of effort to lose weight prior to his fusion surgery.  Not only did he get his surgery and do well, but he also saw significant improvement (and in some cases, resolution) of his other chronic medical conditions.  Simply, by no longer being obese this patient completely changed his life.   

I think about this patient often when I’m considering surgery on a patient.  Thankfully there have been many more success stories like his since then. As I said in that article, my job as a doctor is to care about your overall wellness, not just the structural abnormality in your spine.  I’ve taken great pride in seeing the incredible results in patients that have been successful in losing large amounts of weight, either with bariatric surgery or with intensive lifestyle changes.  Frankly, it’s awesome to see the pride and joy on their faces when they tell me how much weight they’ve lost. 

For all the success stories, though, there are as many patients who tell me they just can’t lose weight. Before getting to them, I’ll tell you about myself.  Just prior to the birth of my first son 6 years ago I was almost 40lb heavier than I am now.  I saw a video of myself and realized I needed to make a significant change in my life or I was never going to be able to be the father that I wanted to be.  Also, my back hurt!  Duh!  (It’s still remarkable to me when patients don’t see the connection between their obesity and back/hip/knee pain, by the way.) Thankfully since then I’ve been able to slowly but surely get down to a healthy weight (I was technically obese 6 years ago.)  On one hand this has allowed me to better empathize with my overweight patients. Losing that weight took a lot of hard work so I don’t take it lightly when a patient tells me it’s a struggle. On the other hand, I now know that, in fact, losing weight is simple (I’m not saying easy).  You just have to maintain a calorie deficit.  This is done either by burning more calories, taking in less calories or, ideally, a combination of both.  Don’t tell me you can’t do that!

“Well how many calories do I need a day, Dr. Thomas?”  Glad you asked.  Prior to embarking on any weight loss journey you really need to know your total daily energy expenditure, or TDEE.  Your TDEE is a measure of your total daily caloric needs based on your age, height and weight (your Basal Metabolic Rate, or BMR) which is adjusted based on your activity level.  It basically indicates how many calories you need at baseline to live and maintain your current weight.  Once you know your TDEE you can then plan your daily calorie intake so that you maintain a caloric deficit.  With some experience you can get pretty dialed in on this based on how fast you want to lose weight.  Want to lose a half a pound a week?  Set a moderate calorie deficit.  Wanna be aggressive and lose 1.5lbs a week?  Set a higher deficit.  It’s not advisable (read: it will be miserable) to try to lose more than 1-1.5lbs a week.  Remember, you want to set a deficit that won’t be so miserable that you won’t stick with it. Plan for the long game and set a reasonable deficit for yourself—no more than 20% of your TDEE, for example.  It may not sound like much but if you lose just 1 pound a week you’ll lose almost 30lbs in 6 months!  A simple online TDEE calculator can be found here.

Ok so now you know your TDEE and you how much of a calorie deficit you need to lose weight.  How did I maintain a calorie deficit?  Like I said, increased calorie expenditure and decreased calorie intake.  First, I started exercising just about every day of the week: increased expenditure.  My exercise routine is based primarily around resistance training with weights with supplemental cardio exercise (swimming is my preferred form.)  It’s beyond the scope of this post to talk about specifics of a weightlifting routine for weight loss (and frankly I don’t know that I’m qualified to do so). Simply put, though, when you pack on some muscle through resistance training you will maintain a higher basal metabolic rate (BMR) so that you burn more calories at baseline compared to if you were to do cardio exercise only.  Put another way, you’re more likely to be in a calorie deficit if you’re having to feed more muscle.  The problem is it’s hard to exercise when your back hurts!  It’s a terrible cycle: you can’t exercise because your back hurts, you gain weight because you can’t exercise and your back hurts more. I completely understand. Even the slightest bit of movement helps though.  Go for a walk outside.  Take the stairs.  Ride a bike. If these activities cause pain find a pool and do some water aerobics.  Just get moving.

I really don’t want to sound paternalistic about exercising (see figure 1).  It’s difficult to start exercising when you’re in pain and it’s discouraging when you’re having a hard time starting.  I get it. Thankfully there’s another side to the weight loss equation:  calorie restriction.  In my opinion, this is not only the more important part of the equation, but also the more attainable.  Prior to my weight loss I always did some baseline level of weightlifting and cardio. I was still overweight though. Why? IPAs mainly, and the fact that I really had no idea what I was putting into my body. What really made the difference for me is when I started tracking my food.  You must take in less than you’re burning to lose weight: limited intake. There is no way you can do that without tracking everything you put in your body day in and day out. 
This sounds like a pain in the butt to do but thankfully these days there are several apps that make it very simple.  I’ve used two apps: LoseIt and My Fitness Pal.  Both are excellent (with both free and paid versions) and will learn what you eat so that tracking becomes much easier the longer you do it.  You can literally set your weight loss goal and the time you want to achieve that goal in, and the app will do the rest. 


UntitledImage

Figure 1: These guys were definitely paternalistic about exercise.

Once you’ve tracked your food for several months you’ll start to get a sixth sense about appropriate portion sizes and about what you should and shouldn’t eat.  And while you technically can lose weight by eating Ho-Hos and pizza as long as you’re in a calorie deficit, it’s not recommended.  The quality of your food matters.  Stick with natural whole foods and stay away from the processed stuff.  Eat the stuff from the outside aisles at the grocery store and stay away from stuff in the middle!   Watch your protein intake too. Remember that your muscle mass acts like a metabolic furnace to help you burn more calories and if you don’t take in enough protein when you’re cutting calories you’ll lose muscle too.  You should maintain a protein intake of at least 0.5-0.75 grams of protein per pound of body weight (even more if you’re trying to build muscle.) 

There you go.  Now you can’t tell me it’s just too hard to lose weight. It really is as simple tracking your food intake so that you can maintain a calorie deficit.  Burning more calories with resistance training is important too but remember weight loss happens in the kitchen, not the gym!   Set reasonable goals for yourself and go out and achieve them!  You don’t have to be great to start but you have to start to be great (thanks Toyota Olympics commercial!!) 

Thanks for reading!

J. Alex Thomas, M.D.

P.S. I learned just about all this information from a book called Burn the Fat, Feed the Muscle by Tom Venuto.  You really can’t go wrong with this book.  The online community for the book can be found here.

When pedicle screws GO WRONG.

Ok that title was totally overdramatic.  Click bait for sure.  While stories of medical mishaps always seem to catch the public’s attention (Exhibit A: the massive popularity of the 2018 podcast Dr. Death), examples of egregious misadventures with pedicle screws thankfully just aren’t that common these days.  Pedicle screws are now so ubiquitous in spine surgery that their insertion is a widely accepted standard of care.  That wasn’t always the case.  Pedicle screws were pioneered in the mid 80’s by an orthopedic surgeon named Art Steffee (and his company AcroMed).  A snafu with FDA clearance and perhaps some poor early outcomes led to a damning expose by the ABC News program “20/20” in 1993.  In this news segment, “The Secret of the Back Screws”, a lineup of patients blamed their persistent pain and other poor outcomes on being used as guinea pigs for testing of a new, unapproved medical device by unscrupulous doctors.   This led to a wave of thousands of lawsuits against doctors, device manufacturers and even medical societies that if successful would have destroyed innovation in spine surgery.  Thankfully by the late 90’s just about all of these lawsuits were dismissed after plaintiff’s lawyers failed to produce any evidence that the use of pedicle screws by spine surgeons was inappropriate and unsafe.  The FDA eventually clarified its stance on pedicle screw fixation and these days they are universally accepted as a standard tool for achieving spinal fixation.

Just like with any tool in medicine, however, there can be problems with pedicle screws.  I think it’s useful to divide these problems into immediate problems and delayed problems with the immediate ones being much more common.  Obviously, I’m not going to cover every possible thing that can go wrong with pedicle screws.  You could spend a very long time trying to list every mishap reported in the literature, or worse, on Google.  Instead, I’m just going to highlight a few of the most common unintended outcomes that can occur when pedicle screws are inserted into someone’s spine. 

Let’s start with the immediate problems.  These problems occur upon insertion of the screw when the surgeon doesn’t quite place the screw in its perfect location.  As surgeons we try to do our best but sometimes things just don’t go as planned. I know, I know…that’s why they call it the practice of medicine.  If a pedicle screw isn’t quite positioned correctly within the pedicle some of the metal of the screw shank can violate the pedicle wall and protrude outside the pedicle.  This is called a pedicle breach and it’s a lot easier to do than you may think. Often, in order to capture the greatest amount of the cortical bone at the wall of the pedicle (this is very hard bone with good pull-out strength versus the soft cancellous bone within the vertebral body) the surgeon will insert a pedicle screw of a diameter that is less than a millimeter smaller than the diameter of the pedicle (see image 1). Thus, it’s not uncommon for a slight bit of titanium to protrude outside of the pedicle wall.  We’re talking razor thin margins here.  By itself, that’s usually not a big deal and doesn’t cause any symptoms.  I check CAT scans on post-op day one for every patient that I do a lumbar fusion on.  This allows me to look for any immediate hardware issues before I let the patient go home.  In analyzing these CT scans for all patients since 2013 I have a pedicle breach rate of around 6% (reported rates in the literature range from anywhere between 1% to 20%.)  Just because it breaches the pedicle wall, however, doesn’t necessarily mean there’s a problem (see image 2).  Only when the breach is significant enough and it’s causing pressure on a nearby nerve root does it become an issue.  That’s because this nerve root compression is typically very painful and is often associated with numbness and even weakness (see image 3).  This should be considered an urgent issue and the screw should be repositioned to a more satisfactory location.  Thankfully symptomatic breaches requiring screw revision are exceedingly uncommon—so far, in nearly 10 years I’ve had to revise 5 out of nearly 2800 pedicle screws, or 0.18%.  Also, as long the screw is repositioned soon after the initial surgery the patient typically does very well and has no long-lasting effects of the malpositioned screw.

Viewer v5 4 202 Internet ExplorerViewer v5 4 202 Internet Explorer

Image 1: Axial CT scan of patient who underwent an L4/5 XLIF with percutaneous pedicle screws.  First image shows pedicle screw well-contained within the bony walls of the pedicle (red lines) without pedicle breach.  Second image shows the tulip head of the pedicle screw (with rod within) seated just adjacent to the facet joint (red circle).  

Viewer v5 4 202 Internet ExplorerViewer v5 4 202 Internet Explorer

Image 2: Immediate postoperative CT scan of a patient who underwent L4/5 XLIF with percutaneous pedicle screws with an asymptomatic pedicle breach.  First image shows very slight medial breach with part of screw thread violating medial wall of the pedicle (red arrow).  Second image shows coronal image again showing very slight medial breach.  This patient no new symptoms and was discharged home on postoperative day 1 in excellent condition.  

Viewer v5 4 202 Internet ExplorerViewer v5 4 202 Internet Explorer

Image 3: Immediate postoperative CT scans on patient who underwent L4/5 XLIF with percutaneous pedicle screws with a symptomatic pedicle breach.  Pt had new severe right leg on postoperative day 1.  First image is axial image showing significant medial breach of right L5 pedicle screw (red arrow).  Second image shows coronal image demonstrating medially breached pedicle screw in contact with traversing L5 nerve (red arrow).  This patient was taken back to OR immediately after discovery of this malpositioned screw and he did very well afterwards with resolution of his leg pain.  

Another consequence of screw malpositioning is violation of the facet joint.  Unlike a symptomatic pedicle breach that causes immediate effects, a facet joint violation is felt to contribute to a long-term problem: adjacent segment degeneration.  As we talked about previously, the correct starting point for insertion of a pedicle screw is at the junction of the transverse process and the facet joint. Thus, when the screw is inserted correctly the head of the screw should be just lateral to (to the side of) the facet joint (see image 1).  Unfortunately, for a variety of reasons, surgeons get sloppy here and end up putting the screw right through the joint during insertion.  This is not uncommon in open spine surgery.  When surgery is done via a traditional open midline incision it can be quite challenging to get enough tissue relaxation to get out far enough to reach that starting point on the transverse process.  In order to truly get out that lateral the surgeon often has to lengthen the incision so it ends up being a very long incision for just a one-level case.  Some surgeons will cut corners here and rather than open up enough to get out to the transverse process they’ll cheat in a bit and place the screw through the facet joint (see image 4).  Recall that the facet joint joins one vertebral body to the next.  Say, for example, you’re placing pedicle screws into the L4 and L5 pedicles during an L4/5 fusion.  The facet joint next to the L4 pedicle connects the L4 level to the L3 level above. You don’t have to be a spine surgeon to understand that if you violate this joint you’re potentially setting the patient up for problems at the L3/4 level down the road.  Add this to the list of benefits of minimally-invasive surgery.  When you insert pedicle screws via small Wiltse incisions off midline you can plan those incisions to fall right over the correct starting point and theoretically have less chance of violating the facet joint. (Full disclosure, facet joint violation can happen during placement of percutaneous screws as well.  This has to do with the way that many surgeons are taught to place percutaneous screw during which they target the oval shape of the pedicle on the AP fluoro shot.  Typically, though, the percutaneous technique at least gives the surgeon a better chance to place the screw via the correct starting point.)

Viewer v5 4 202 Internet Explorer

Image 4: CT scan of a patient who underwent open L5/S1 fusion several years prior in a different practice.  Note the L5 pedicle screws which were inserted straight through the L4/5 facet joint (red circle). Compare the straight in trajectory of these screws with the triangulated trajectory of the ideally placed screws in image 1.  This patient had adjacent segment at L4/5 which required an extension of his fusion.  

A quick comment about navigation and robotics in spine surgery.  In the industry these technologies are referred to as enabling technologies because they enable surgeons to adopt a skill (i.e. placing percutaneous pedicle screws) that they previously may have had difficulty doing.  The evidence in the literature is clear: navigation and robotics definitely improve accuracy of pedicle screw placement.  Surgeons using this technology can get lower rates of pedicle breaches or facet violations.  I do use robotics in some long deformity cases where I’m inserting many screws into a very deformed spine.  This not only helps my accuracy but also significantly decreases my radiation exposure from fluoroscopy.  For the vast majority of my cases (up to 4-levels fused), however, I will not use robotics or navigation and instead will just place the screws freehand using only fluoroscopic images.  My issue with the technology is that it adds a lot of time to my cases.  For a standard one-level XLIF with pedicle screws my average total case time is about 60 minutes.  Setting up the robot may take an extra 30 minutes, a 50% increase in the time that the patient is under anesthesia.  My feeling is that if my rate of revision of malpositioned screws is so low (remember, 0.18%) why would I subject the patient to extra anesthesia time when I don’t really need the added accuracy benefits of the robot?  This is a controversial topic that I debate with my partner all the time (he’s a prolific user of robotics in spine surgery.)  I plan to devote a separate post in the future to robotics in spine surgery.   

Ok, the final mishap involving pedicle screws that you may encounter as a patient is a broken pedicle screw.  This is one of those findings on radiology reports that really makes patients anxious.  Again, don’t read your radiology reports if you can help it.  If you’ve ignored my previous advice and have read your radiology report and it describes a broken pedicle screw, don’t panic.  One of my favorite mentors at Georgetown always described the healing of a lumbar fusion as a race between the development of the bony fusion versus failure of the hardware (thanks Dr. Kalhorn).  Remember, the goal of a spinal fusion is to promote bone growth across a motion segment to immobilize it.  The pedicle screws and rods only act as an internal brace to immobilize the segment while the bone growth occurs.  The screws and rods are not indestructible though.  If fusion fails and motion at the segment persists the metal will eventually fatigue and break.  Sometimes, though, this happens at the very end of Dr. Kalhorn’s race and enough bony fusion has occurred that despite the broken screw it still goes on to fuse.  So: a broken screw does not necessarily indicate a problem with your fusion.  That said, a non-union (non-healed fusion) will commonly lead to a broken screw.  So, if a broken screw is discovered on follow up imaging after your fusion your surgeon must confirm that the fusion is well-healed.  The broken screw may be a warning sign that something is wrong with that fusion (see image 5).

CT broken screwAP broken screwPostop

Image 5: CT scan (first image) and AP X-ray image (second image) showing broken S1 pedicle screws.  This patient had a non-union after TLIF from L4-S1.  In addition to the non-healed fusion, his surgeon also violated the facet joint at L3/4 with the L4 pedicle screws.  He required revision to remove the non-fused TLIF spacers as well as to extend up the L3/4 level to address the adjacent segment degeneration (third image, note we couldn’t remove part of the fractured S1 screws and had to put new screws in below them.) He did very well post-op and went home on the day after his revision surgery.  

Thanks for reading!

J. Alex Thomas, M.D.

Percutaneous Pedicle Screw Fixation: a step-by-step guide for patients

Those of you paying attention while reading the article describing the steps of the XLIF procedure probably noticed that I really only covered the first half of a full XLIF procedure: I only discussed the placement of the intervertebral spacer.  As I’ve discussed previously,  supplemental posterior fixation is typically also used in conjunction with the intervertebral spacer (some surgeons will just perform a “standalone” fusion with just the spacer but this isn’t that common in the U.S.)  This posterior fixation acts an internal brace to immobilize the treated motion segment of the spine to facilitate bony growth across the intervertebral spacer (i.e. the fusion.) 

The only form of posterior fixation that I use in my lumbar fusion cases is pedicle screw fixation.  Pedicle screws (some patients have heard them referred to as “pins”) are by far the most common form of posterior instrumentation inserted during spinal fusion cases.  These screws get their name from the fact that they traverse the pedicle of the vertebral body which is like a bridge between the facet joints and lamina posteriorly and the vertebral body anteriorly (see image 1).  When inserted properly, the threads of the screw will be surrounded by the hard cortical bone of the pedicle which provides significant pull out strength to the screw (see image 2). 

Netter Lumbar Spine jpg 

Image 1: Lateral (side) view of the lumbar spine.  The pedicle is the bridge of bone (outlined in red) that connects the posterior elements to the anterior elements of the spine.  

Viewer v5 4 202 Internet Explorer

Image 2: Axial (cross-sectional) CT scan showing pedicle screws traversing L4 pedicles (the right pedicle is outlined in red) to terminate in the vertebral body anteriorly (“VB” on image). The bone at the edges of of the pedicle is hard cortical bone.  The screw should be sized such that the threads of the screw capture this hard cortical bone so that the pull-out strength of the screw is increased.  The triangulation of the screws with the lateral-to-medial trajectory also helps resist pull-out.

A step-by-step description of how I place pedicle screws is as follows:

Step 1: I first have to plan where I’m going to make my incisions for screw insertion.  After the flank incision of the XLIF is closed I’ll then take AP and lateral fluoroscopy shots to mark the boundaries of the pedicle on the skin of the lumbar region (see image 3).   Typically the incision will be about 1.5cm lateral to the lateral edge of the pedicle on the fluoro image (see image 4).  These Wiltse incisions are well off midline and thus spare the damage to midline ligamentous structures often seen with traditional open incisions (devoted Spinal (con)Fusion readers know this as one of the basic tenets of minimally-invasive spine surgery).  Since I always place bilateral pedicle screw fixation (some surgeons settle for unilateral screws but the gold standard is bilateral fixation) there will be one incision on each side of the spine to allow placement of all of the screws on that side.  Thus, a typical 1-level XLIF patient will have three incision when they’re done: the flank incision and two lumbar incisions.

IMG 0654Viewer v5 4 202 Internet Explorer

Image 3: Image on left shows me using a K-wire on the skin of the lumbar region to mark the lateral radiographic border of the pedicle on the AP fluoroscopic image (image on right shows the wire at the lateral border of the left sided pedicles.  The red oval is marking the left L3 pedicle.)  

IMG 3292

Image 4: Hatch marks on the line marked previously (tough to see on this image, may need to zoom in) mark the center of the pedicle as marked on a lateral fluoroscopic image.  I’ll then plan a small incision one finger-breadth lateral (outside of) the mark made along the lateral border of the pedicle.  I typically make one incision on each side of the spine for the screws on that side (so in this case involving pedicle screws at L4 and L5, the two screws on each side will be inserted through the one small incision.)  

Step 2: I’ll then make the incision and carry it down through the fascia.  I rely heavily on tactile feedback and don’t want the tough fascia to interfere with that feedback.  Once that’s done I’ll then use a large needle called a Jamshidi needle to dock on the bony anatomy of the starting point for pedicle cannulation.  The starting point for insertion of a pedicle screw is classically defined as  the junction of the transverse process (TP) with the lateral border of the facet joint (see image 5).  Often there’s a small protuberance of bone there called the mamillary process that is like a bullseye for the entry point into the pedicle.  Recall that because I primarily use minimally-invasive techniques (rather than open surgery) I’m not able to actually see this starting point.  Here’s where that tactile feedback is so important: the feel of the tip of the needle on the compact bone at this starting point is unmistakable.  Once I’m on that bone I’ll walk the tip of the needle medially (towards midline) until I hit the facet joint and boom, I’m there.  Of course, I’ll confirm that I’m where I’m supposed to be by checking a fluoroscopy image (see image 6).


IMG 0412IMG 0411

Image 5: posterior (top) an lateral views of the starting points (red dots) for pedicle cannulation at the junction of the transverse process(TP) and facet joint (FJ).  On lateral view the pedicle is outlined in blue.


Viewer v5 4 202 Internet Explorer 2Viewer v5 4 202 Internet Explorer 1

Image 6: AP (eft) and lateral fluoroscopic images showing Jamshidi needle docked at starting point for pedicle cannulation.  The image on left shows needle docked at left L5 pedicle (after a K-wire was placed already at L4) and the image on right shows docking at L4 pedicle.  The right L4 transverse process (TP) and facet joint (FJ) are marked.

Step 3: Once I know I’m at the correct starting point I’ll start to hammer the Jamshidi needle into the pedicle.  Once you penetrate the hard bone at this junction point it’s almost like you fall into the soft bone within the pedicle.  I then hammer in the needle at a 25-30-degree angle to a depth of at least 25mm to enter the soft cancellous bone of the vertebral body.  How do I know I’m where I’m supposed to be?  Of course I can check fluoroscopy to be sure I’m heading in the correct trajectory.  Also, remember all those neuromonitoring leads we hooked up to the legs prior to starting the XLIF?  We use their feedback during placement of the screws as well.  The tip of the Jamshidi needle is electrically stimulated as I’m impacting it through the pedicle.  If I inadvertently breach the inner wall of the pedicle where the nerve passes by, the needle will stimulate that nerve and we’ll be able to pick up that stimulation in muscle of the leg supplied by that nerve (see image 7).  This monitoring definitely provides one extra layer of safety to prevent any malpositioned screws.   

273499 2 En 7 Fig2 HTML

Image 7: Intraoperative monitoring feedback during pedicle cannulation with Jamshidi needle.  Image on left shows tip of needle medially breached and in close contact with nerves within spinal canal.  This stimulates the nerve at a low threshold and thus gives the surgeon a red “warning” indication.  The image on the right shows the tip of the needle completely within the bone of the pedicle and thus only stimulates the nerve at a much higher threshold, thus the “safe” green indication.  Adapted from Gupta et al, 2019.


Step 4: The Jamshidi needle that I passed into the vertebral body via the pedicle is a hollow-bore needle with a stylet within.  Once the needle is properly inserted into the pedicle I remove the inner stylet and then pass a Kirschner wire (or K-wire) through the needle into the vertebral body and carefully remove the needle.  This will serve as a placeholder within the pedicle to guide the screw into place via the proper trajectory.  After all the wires have been inserted I will check a confirmatory AP and lateral fluoro shot to confirm proper placement (see image 8). 

IMG 9269Viewer v5 4 202 Internet Explorer 2

Image 8: Intraoperative (left) and AP fluoroscopic image showing all 4 wires in place within L4 and L5 pedicles.

Step 5: Now it’s time to place the pedicle screws. Unlike standard pedicle screws used in open spine surgery, the screws used here are cannulated so that they can be passed over the K-wires (see image 9).  Again, I know from from the previous fluoro image that the wires are where I want the screws to be so I just pass the screw over the wire and follow it right down the pedicle (I use a power driver to make this easier on my wrists; see video below.)  I typically remove the wire once I’ve inserted the screw about half way into the pedicle (if you’re not careful the screw will start to catch the wire and can advance it right out the front of the vertebral body into the abdomen.  Not good.)  Typically for a fusion at L4/5 these screws are 6.5mm in diameter and 45mm in length (see image 10). The screws are made out of titanium so no, they won’t set off the metal detector at the airport (this is one of the top three questions I get in clinic.)  Just like after the wires I’ll check fluoro shots here to confirm proper positioning of the screws (see image 11).

IMG 3275

Image 9: the cannulated pedicle screw is passed over the wire into the pedicle. 

Video: insertion of cannulated pedicle screw over a K-wire using power driver.  

Https www nuvasive com wp content uploads 2017 03 Posterior Fixation Patient Education Brochure US pdf

Image 10: pedicle screws with rods and locking caps in place.  Courtesy: Nuvasive corp.

Step 6: Now that the screws are in place in each pedicle I now have to connect the screws on each side of the spine to one another so that they can collectively act as an internal brace.  This connection is made by securing a rod into the tulip heads of each pedicle screw (see image 10).  In open spine surgery the surgeon can see all of the heads of the screws and just drop the rod in place and lock it down with locking caps.  Percutaneous pedicle screws, on the other hand, typically have a reduction tower attached to facilitate passage of the rod via the small minimally-invasive incisions.  After screw insertion I then line up the apertures of the towers and then pass the rod through each tower and down into the screw heads (see image 11). This rod usually is curved a bit to match the desired curvature (lordosis) of the lumbar spine.  Once I’ve confirmed the rod is properly seated I then screw a locking cap in place into the tulip head (the inside of the tower is also cannulated to get the locking cap started in the correct trajectory and also to help reduce the rod if necessary.) This is a little tricky to master and can be one of the most frustrating parts of the case, particularly when passing a rod through several towers as in a multi-level fusion.  With a little patience, though, and some fluoro shots, it typically goes smoothly.   Once I’ve final tightened the locking caps in place, the reduction towers are removed.  That’s it!  Now the cage is in place in front of the spine and the screws and rods are place in the back of the spine (see image 13).  

Viewer v5 4 202 Internet Explorer 3

Image 11: AP fluoroscopic image showing pedicle screws, with attached reduction towers, in proper position within L4 and L5 pedicles.  

IMG 3508 

Image 12: pedicle screws (with attached reduction towers) are in place.  Here, we begin to pass a rod through the reduction towers and down into the heads of the screws where they can be locked in place with locking caps.  It takes a bit of practice to do this via such a small incision.  

Viewer v5 4 202 Internet Explorer 4Viewer v5 4 202 Internet Explorer 5

Image 13: AP (left) and lateral standing X-ray images showing properly positioned cage and pedicle screws after L4/5 XLIF procedure. 

In an upcoming post I’ll discuss what can happen if the above process doesn’t go as planned. 


Thanks for reading!      


J. Alex Thomas, M.D.
Source: Gupta M., Taylor S.E., O’Brien R.A., Taylor W.R., Hein L. (2019) Intraoperative Neurophysiology Monitoring. In: Phillips F., Lieberman I., Polly Jr. D., Wang M. (eds) Minimally Invasive Spine Surgery. Springer, Cham.